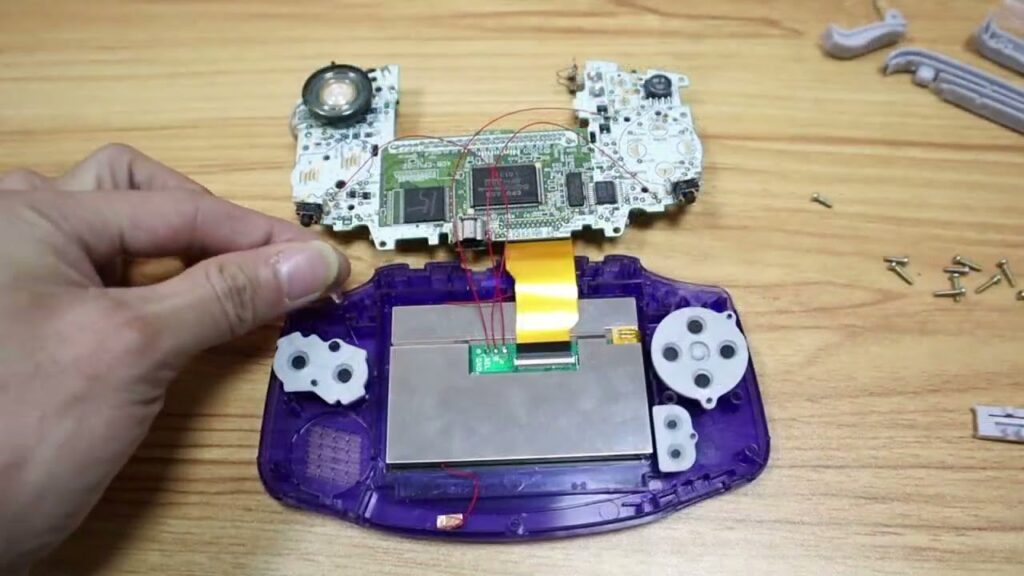
◕Integer Scaling. No any distortions.720×480 display resolution.
◕Add FRM On/OFF function(Frame blending On/OFF).
◕9 pixels to 1 pixel. Retro pixel Effects: Normal, Retro pixel (like original AGS-101 LCD), Scanline 1 and Scanline 2.
◕Built-in OSD Menu! Wide View angle up to 178 degree.Touch Screen to change the brightness and the color modes.
◕Compatible 32pin and 40pin motherboard.
◕OSD Menu Operation:
-Press the Select+L+R buttons for 1 second at the same time, then release the buttons to activate the OSD Menu.
-Press the Select button to select the adjustment item when OSD Menu activated.
-Press the L or R button to adjust the item when OSD Menu activated.
All the accessories and replacement parts mentioned in this video can be purchased from the awesome retro game store – www.eebuys.com
We can also customize the whole game machine according to your demand. Just contact us.
source
gameboy ips
[vid_tags]
#detailed #introduction #NEWEST #Pre #Laminted #GBA #IPS #Kits #HISPEEDIDO


Hi there. I assemble and it is working. There is an issue with the touch. It stays changing the resolution automatically. Is there anything I can do? Thanks
Is the screen lens plastic or glass? Is it replaceable since it's laminated..?
Where can I find a shell that would work for this kit?
I have replaced my screen but during the process I have broken one of the sensors. Is is possible to buy anywhere one spare sensor to replace the original one?
Does this kit work for all shells?
I'm getting light coming from the top left. Not on the screen but rather through the see-through case (the same one as in this video). Not sure how you managed to make that not happen
Hi, where are buy this panel ips?
Will this fit my Boxy Pixel GBA shell Version 1?
I just built using the kit including the precut shell and buttons. The L shoulder button wobbles a bit and it seems the top left of the front and back of the shell isn't tight enough to prevent this from happening despite tightening the screws as much as I could. Wondering if this is a product flaw as I don't want to risk stripping the screws
On the boot up screen it has a line of blue light where it says “gameboy”. Why are there lines of horizontal repeating pixels? It makes it impossible to play
Isn't soldering on a pcb so close to the screen risky? Isn't there a risk of damaging the screen with the heat from the soldering iron?
I have a question about accessing the OSD menu. Do you have to push L, R, and select at the same time? Or is it like funny playing where you just have to hold down select?
Link of ebay link to buy this kit from you ?
Urgh, the contact point for the R shoulder came off while soldering so i cant connect it to the board.
Do I have to to solder this or is it working fine without?
I don't like that the lens comes pre-attached to the screen. It makes it difficult to get it into the shell. Mine went in at a weird angle and I had to get it out. Pretty sure I broke it because now the display does not come on.
greatest ips for GBA out there. got mine and love it! also have my GBC, your products are amazing guys!
Anyone can help me keep my strip locked in place on the screen
Why doesn't your eBay store ship to UK?
I just ordered the whole kit with laminated v5 IPS screen, the USB-C battery mod and a new case from you guys. I like that you do not have to open the menu to control the lighting. Wish me luck with the soldering 😅
great kit, just wish the resolution was lower. Not sure what the benefit of 9 to 1 integer scaling is over 4 to 1. But it definitely uses more power.
Can the glass lens be removed and replaced ?
How i change pixel mode and brightness without soldering the wires?
Finished my mod up yesterday. Couldn't be happier with how my clear smoke shell and purple buttons came out.
What options do you not have access to via the touch pads if its just FRM could you not update the firmware to have long press both touch pads to turn on/off FRM?
I can't get the case for this IPS. Does anyone know where to buy it?